WordPress is an easy way to create your own blogging site and with the addition of Nginx Proxy Manager you can easily manage your SSL certificates. And WordPress is a powerful platform for webpage creation and used by many web developers beyond blogging to business and eCommerce sites. There are a ton of themes and plugins available, so you can tailor the web experience to cover any need. And you can even edit the actual code of the site, but I find the Gutenberg built in editor to be pretty easy to use and more than sufficient. So why use a social media platform that censors content and manipulates it’s users by what content they push when you can run your own site on hardware as simple as a Raspberry Pi, a Raspberry Pi 3 in my case. After all, this was the revolution that was the internet, anyone can self post content whether blogs, news, audio podcasts, video content… And you just might find you enjoy the exercise of making your own content and exploring topics as writing forces you to organize your thoughts and understand things just a bit more.
So I covered how to install docker in my post on running Pi-Hole and Unbound, so we skip right to installing Nginx Proxy Manager. You’ll need to create the network in docker (I’ll assume you can use an editor and update the files):
docker network create nginxproxymanagerThen create a directory nginxproxymanager to hold your docker-compose.yml file:
mkdir ngingxproxymanagerThen create your docker-compose.yml file:
version: '3'
services:
  app:
    image: 'jc21/nginx-proxy-manager:latest'
    restart: unless-stopped
    ports:
      - '80:80'
      - '81:81'
      - '443:443'
    volumes:
      - ./data:/data
      - ./letsencrypt:/etc/letsencrypt
networks:
      default:
        external:
          name: nginxproxymanager
Then you can start your instance:
docker-compose up -dAnd you can access Nginx Proxy Manager via your browser, ip:81. You’ll have to set up your login and password. But before we set up your site and SSL certificate, we’ll need to create our WordPress site and database.
Create ~/wordpress directory:
mkdir ~/wordpress
cd ~/wordpress
Create your docker-compose.yml file and update the login and passwords:
version: '3.1'

services:

  wordpress:
    image: wordpress
    restart: always
    #ports:
    # - 80:80
    environment:
      WORDPRESS_DB_HOST: db
      WORDPRESS_DB_USER: login
      WORDPRESS_DB_PASSWORD: password
      WORDPRESS_DB_NAME: wpdb
    volumes:
      - wordpress:/var/www/html

  db:
    image: jsurf/rpi-mariadb
    restart: always
    environment:
      MYSQL_DATABASE:  wpdb
      MYSQL_USER: login
      MYSQL_PASSWORD: password
      MYSQL_RANDOM_ROOT_PASSWORD: root_password
    volumes:
      - db:/var/lib/mysql

volumes:
  wordpress:
  db:
networks:
      default:
        external:
          name: nginxproxymanager
Then you can run your WordPress and database instance:
docker-compose up -dOnce running you can find the name of your WordPress instance in docker:
docker ps
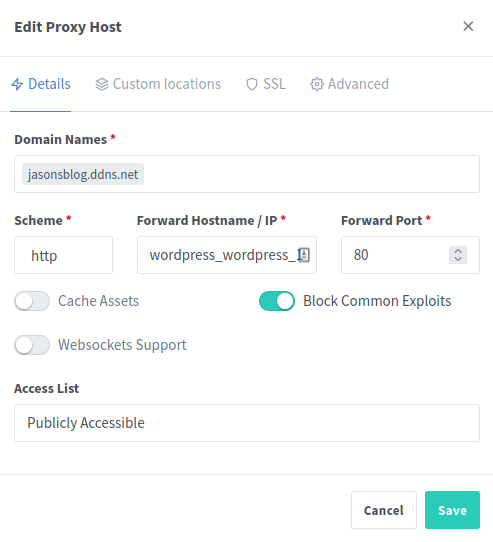
In my case my WordPress instance is wordpress_wordpress_1 which I’ll use to add in Nginx Proxy Manager as a host. And don’t forget to open port 80 in your router and point it to your Raspberry Pi where you’re installing WordPress.

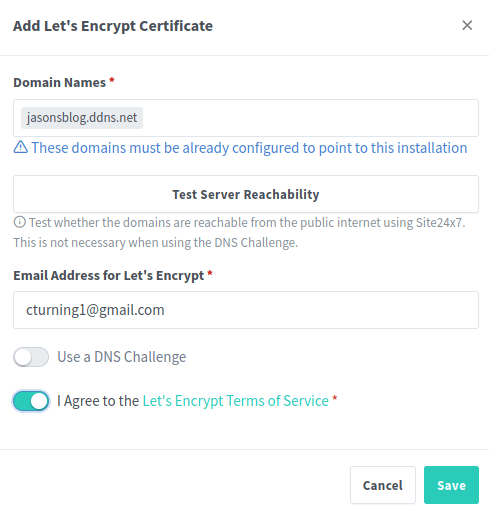
Then you’ll go to the SSL tab and add new SSL certificate and select Let’s Encrypt which gives free SSL certificates.

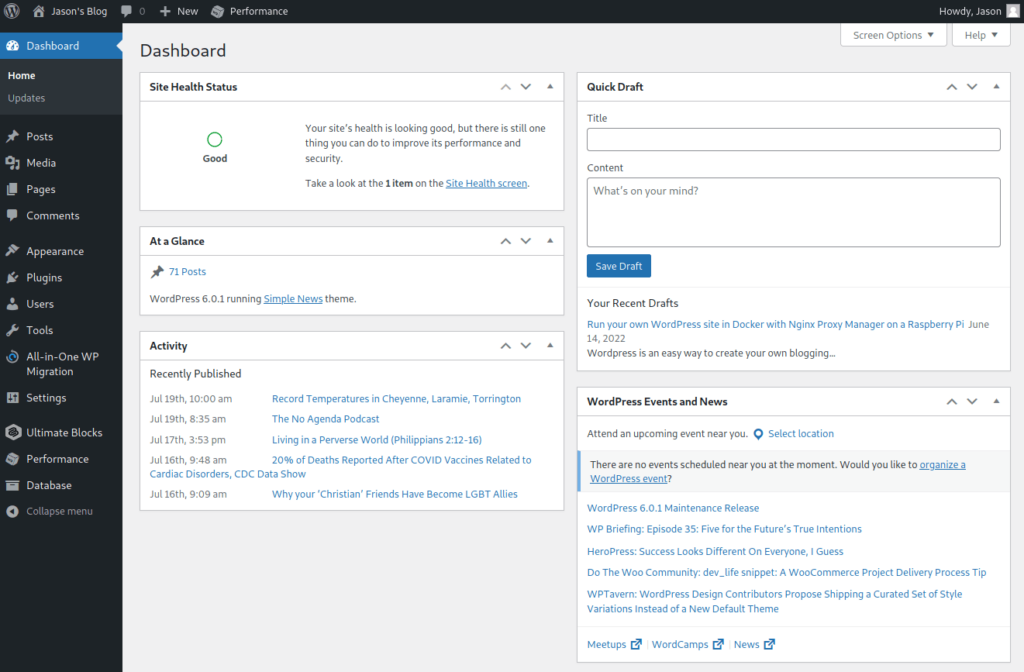
You’ll add your domain name and test the server reachability, agree to the terms of service and hit save and Nginx Proxy Manager will get your new certificate. Mine is already set up, so I get a warning message above. If you don’t have a domain you can go the free route and get one from a dynamic DNS provider like noip.com. And usually your router will have some capacity to update the IP when changed or you can run a client on the machine. And to get started with WordPress go to https://yourdomain/wp-admin/ and WordPress will walk you through setting up your account and after you’ll come out to your dashboard.

Using WordPress has a bit of a learning curve, but below is a list to the WordPress documentation.
https://codex.wordpress.org/Getting_Started_with_WordPress
So with Docker it couldn’t be easier to get a WordPress site running on even a Raspberry Pi, and Docker gives you isolation and containerization of the instance as it is publicly accessible to the internet. But with anything, you’ll want to keep the instance up to date and your WordPress dashboard will help with showing you when updates are available for themes and plugins as well as the WordPress installation itself (you can have themes and plugins auto update). I like to run this command on my docker installs daily to pull any new images:
docker images |grep -v REPOSITORY|awk '{print $1}'|xargs -L1 docker pull If you see it pull down a new WordPress, MariaDB or Nginx Proxy Manager image you can go into your related directory and rerun:
docker-compose up -dAnd after you can use the Docker CLI command to remove old images or make it easier and use Portainer.
In my case I’ve disabled comments as life is too short to deal with the “woke” people caught up in the “Mass Formation” and all the emotional noise they generate, but feel free to have a more social site and enjoy your very own WordPress blog.