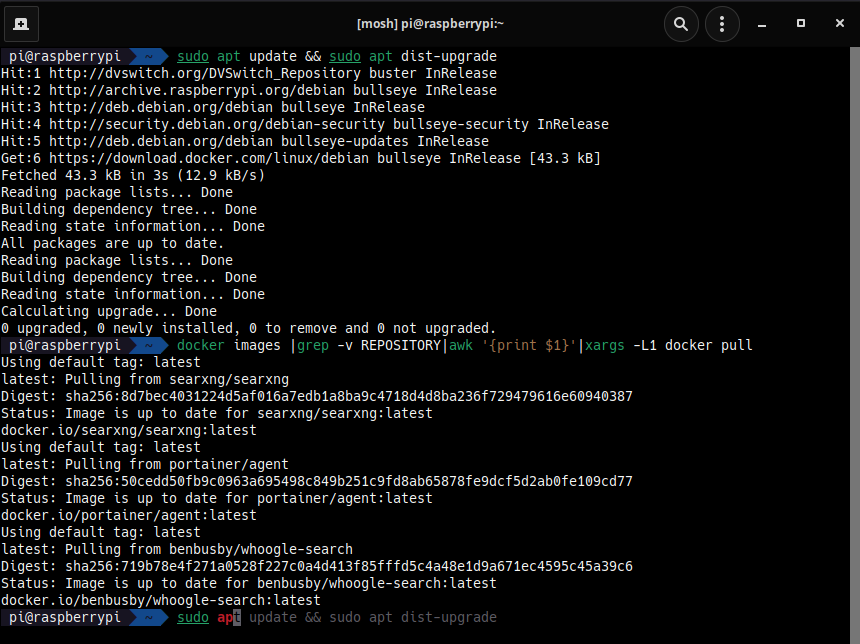
In my decades of using Linux, I’ve never really ventured away from BASH, Bourne Again SHell, which was a GNU project to improve upon the Bourne Shell that originated with Bell Labs and AT&T my former employer. But with using Kali Linux I was unknowingly using Zsh with a couple wonderful plugins which has motivated me to switch over most of my machines and virtual machines. Not only can you jazz up the look of your terminal with multiple themes included in Oh My Zsh, but two plugins are extremely useful, zsh-autosuggestions and zsh-syntax-highlighting. Syntax Highlighting just helps you format your command and Auto Suggestions helps pull in history by showing you commands you regularly use without needing to finish typing the command.

To install Zsh on Debian/Ubuntu systems:
sudo apt install zshTo install on Arch based systems:
sudo pacman -S zshTo install on Red Hat based systems:
sudo dnf install zshTo install on Solus Linux:
sudo eopkg install zshTo change the shell you’ll need to get your zsh location:
whereis zshThen use that location to switch shells, and you can also use autocomplete to help, usually /bin/zsh as below and substitute your login id for user:
chsh -s /bin/zsh userTo enable zsh you’ll need to logout and log back in. But we’ll continue by installing Oh My Zsh (you might need to install git and wget on your system like zsh above):
wget https://github.com/robbyrussell/oh-my-zsh/raw/master/tools/install.sh -O - | zshIt’s always a good idea to inspect scripts before you install, and you can examine the script here.
Once installed copy files:
cp ~/.oh-my-zsh/templates/zshrc.zsh-template ~/.zshrcNow we’ll install the zsh-autosuggestions plugin:
git clone https://github.com/zsh-users/zsh-autosuggestions.git ~/.oh-my-zsh/custom/plugins/zsh-autosuggestionsThen install the zsh-syntax-highlighting plugin:
git clone https://github.com/zsh-users/zsh-syntax-highlighting.git ~/.oh-my-zsh/custom/plugins/zsh-syntax-highlightingThen we’ll need to edit the file ~/.zshrc, change the theme to Agnoster:
ZSH_THEME="agnoster"Then we’ll update the plugins (can be changed to your needs and here is a list of available plugins here):
plugins=(git colorize github pip python zsh-autosuggestions zsh-syntax-highlighting docker)Save the file and then we’ll need to load into zsh:
source ~/.zshrcNow logout and back in and you’ll have zsh as your shell. If the Agnoster theme doesn’t show properly, not the clean arrow prompt, you’ll need to install the Powerline font in your distribution as I had a couple where it wasn’t installed by default. One note, when using the zsh-autosuggestion to accept the command it is showing hit the right arrow or END key.
Now with Oh My Zsh you’re not limited to just one theme, and you can look through the available themes here, and to enable you’ll need to change in ~/.zshrc and reload with the source command. If the theme doesn’t display properly you may need to install some additional fonts from Nerd Fronts. And there are a lot more additional themes you can look through on the Oh My Zsh Github page as well.
I think you’ll agree that with auto suggestions and syntax highlighting you’ll find Zsh a delight to do your command line work. And there are even more shells if you want to experiment not to mention a lot more customizations you can make to Zsh. You have to love the variety you have with Unix and Linux systems not to mention the power of the command line in completing tasks.
One additional tip, if you like to run a program and have it go to the background and say close the terminal, there was one quirk with Zsh, you have to use &! instead of just &. And if you want to go back to BASH you’d use the chsh command above to point your user back to BASH.
I hope you enjoy using Zsh as much as I do. And it makes me think it’s time to try out the other shells as well.